Unleashing collaboration with Notion's Jira integration
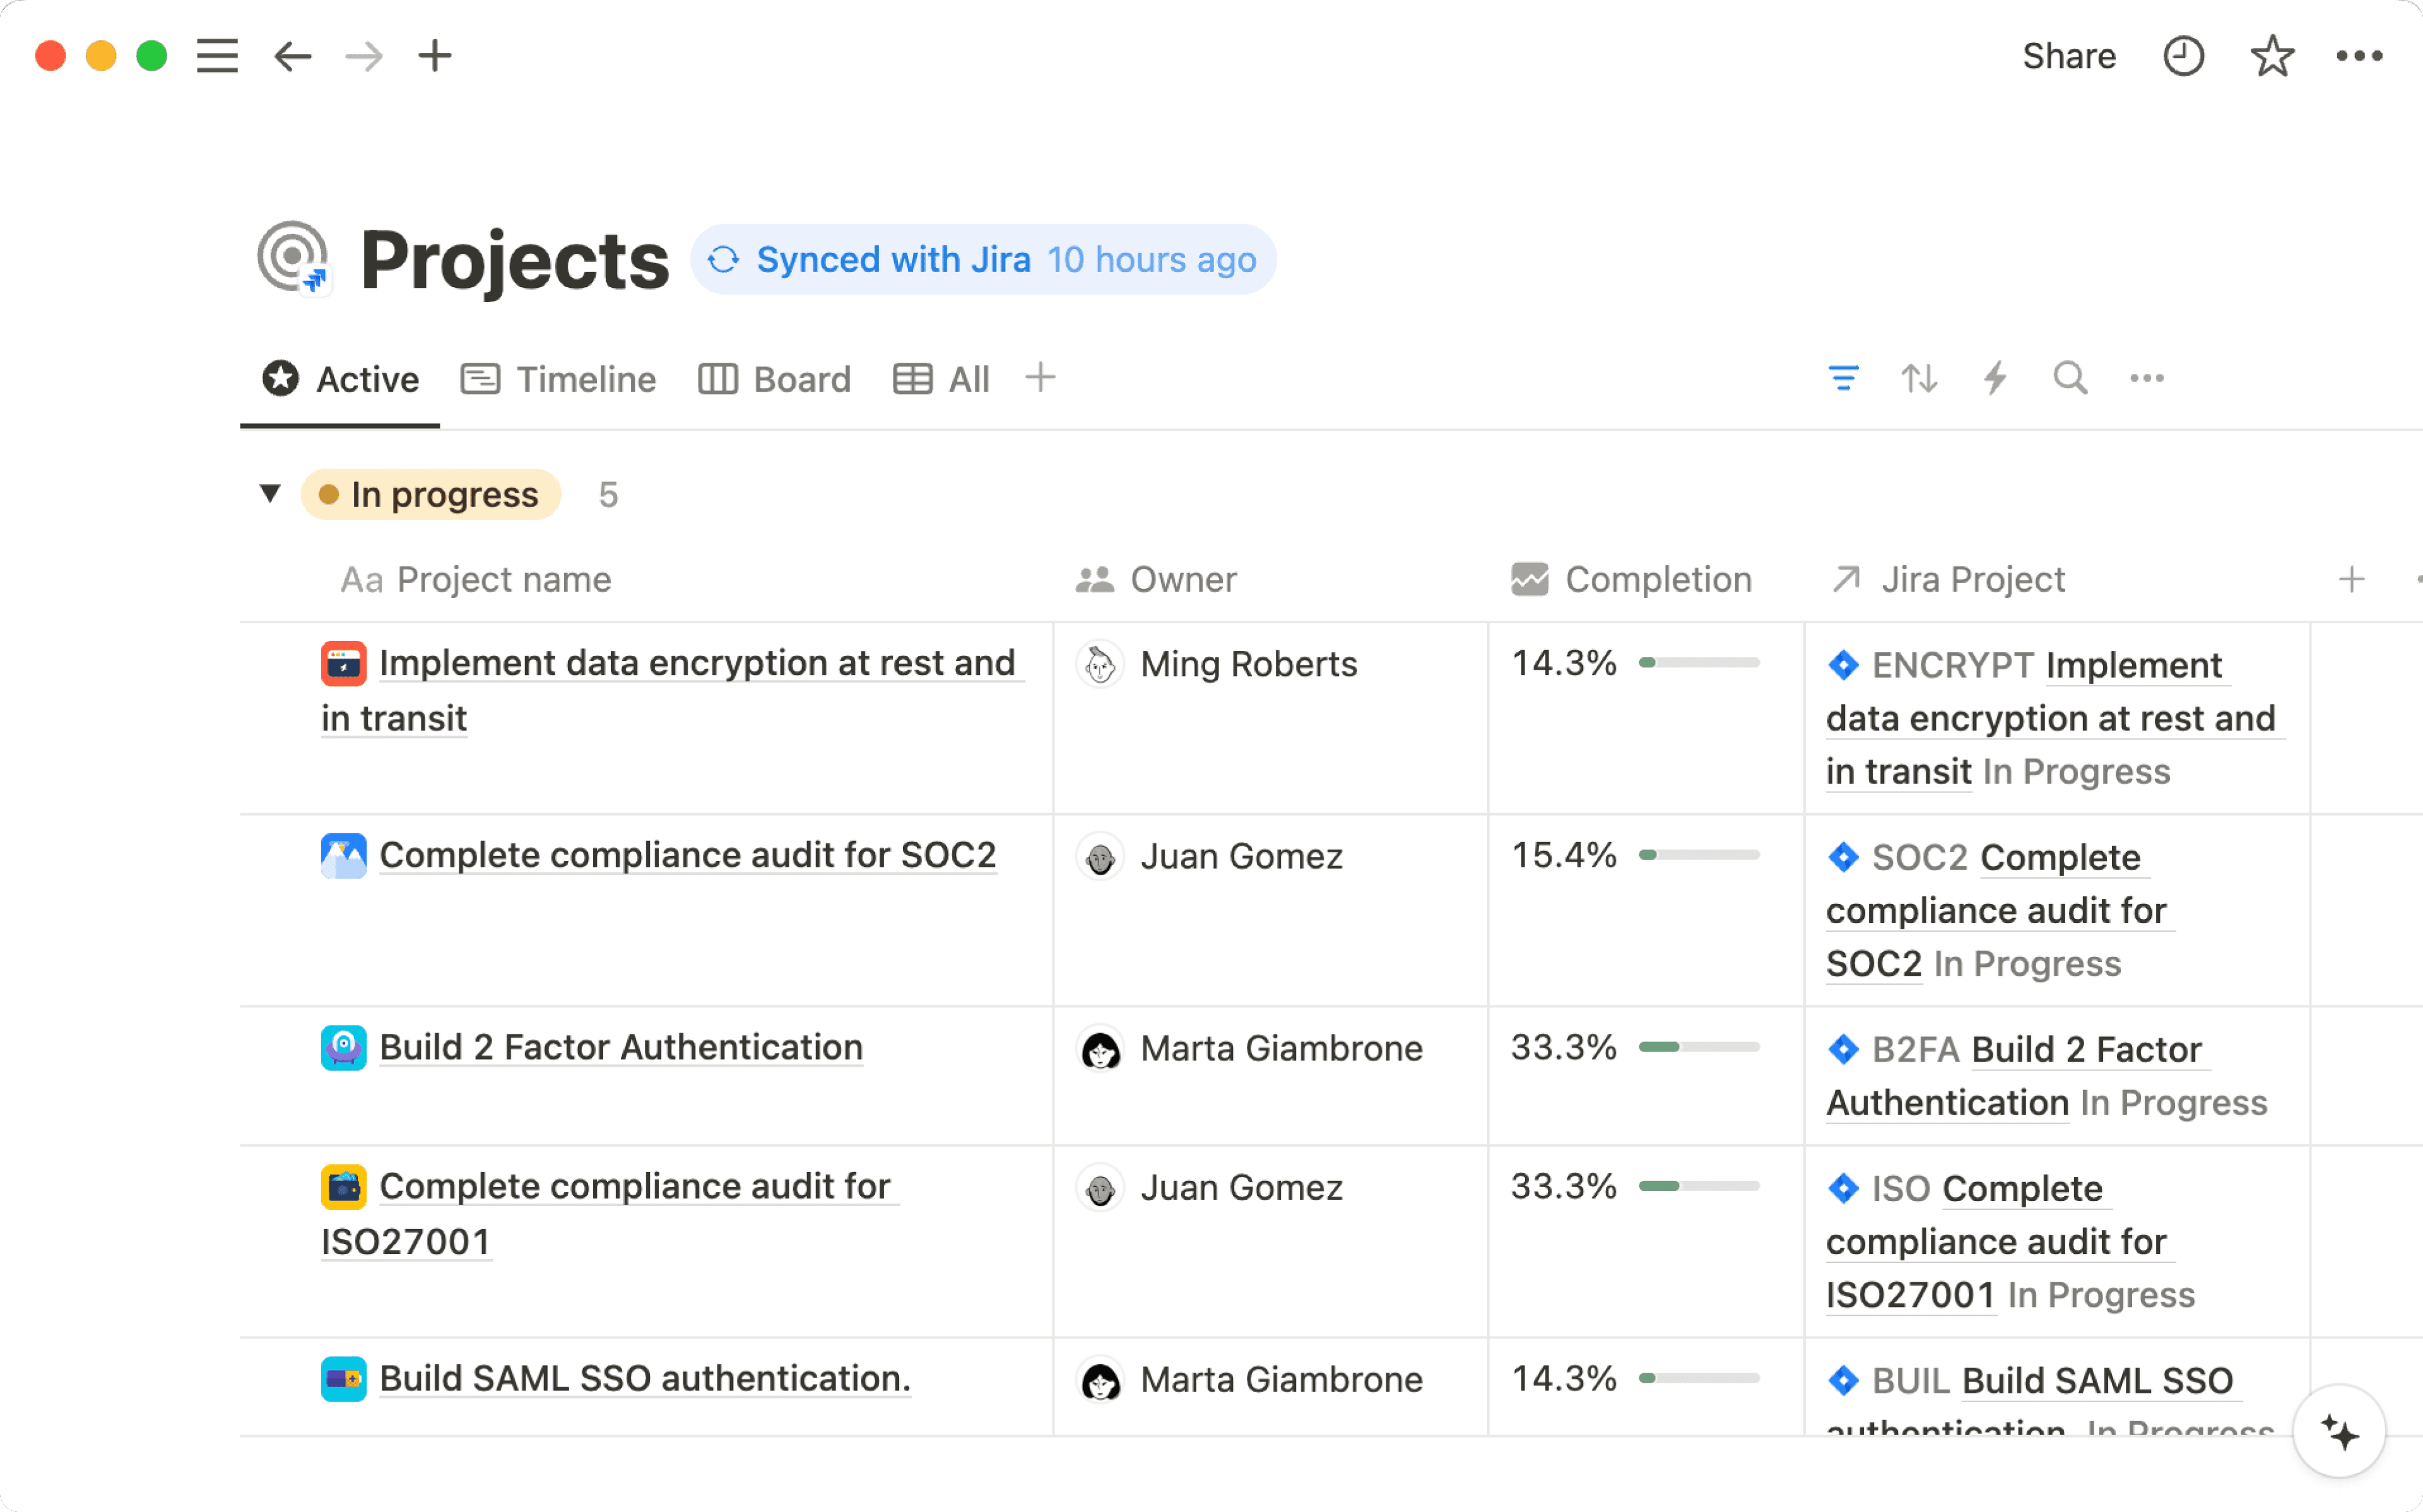
Whether you need to streamline your Jira workflow or simplify project tracking for non-technical teams, integrating Jira with Notion offers a powerful and flexible solution. Here's everything you need to know about Jira sync.
- Get your Jira sync up and running
- Best practices for connecting Jira and Notion
- Three ways to maximize your integration beyond basic database syncing
- 1. Consolidate and sync Jira issues with your My Tasks database
- 2. Run smoother and more collaborative engineering stand-ups
- 3. Connect and centralize project resources in one unified space
- How to get the most out of Jira insights in Notion
In today's fast-paced world, teams often juggle multiple tools, leading to scattered information and clunky workflows. While engineering teams are deep in Jira territory, other departments might struggle to access or understand that valuable data.
Imagine a world where your project management tools work in perfect harmony. Integrating Jira with Notion bridges the gap between technical and non-technical teams, creating a unified workflow. By syncing Jira projects and issues into Notion's flexible workspace, you establish a single source of truth, ensuring everyone stays informed. While Jira remains the powerhouse for detailed project tracking, Notion provides a clear and accessible overview for those who aren't Jira experts.
In this guide, you'll learn how to:
Understand the ropes—connect with Jira and understand the roles of workspace members vs. workspace owners
Explore three ways to maximize your integration beyond basic database syncing
Make Jira data accessible and easy to understand for everyone in your team, even if they don't use Jira directly
The Jira Sync integration connects Jira projects with Notion through the use of an Admin API token (instead of a user token), allowing for a more unified experience. First things first—you'll need a workspace owner to connect Notion with Jira (check out how to do that here).
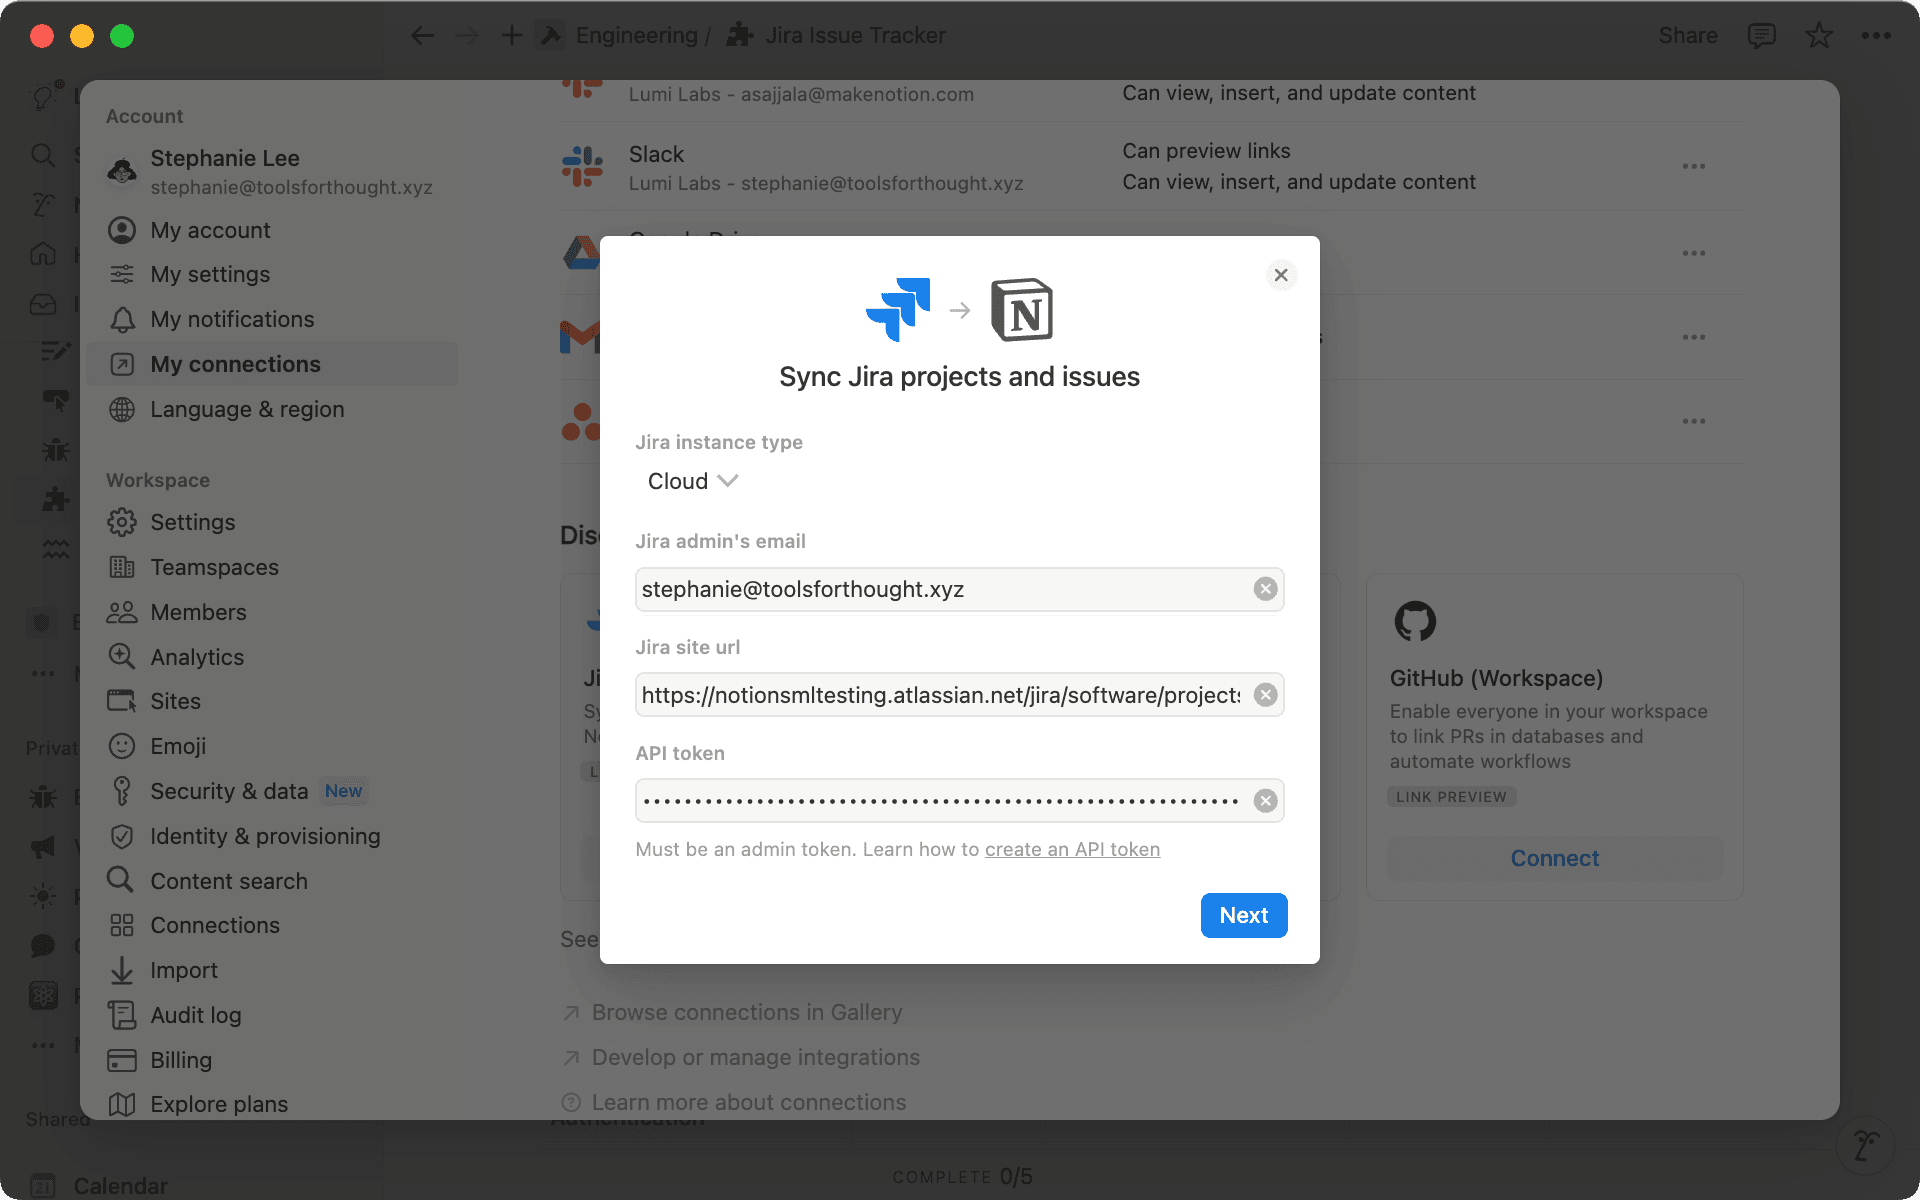
Once everything's up and running, any workspace member can create new syncs, add projects, or customize things to their liking—as long as they have the right permissions.

Workspace Member vs. Owner— What's the difference?
Best practices for connecting Jira and Notion
Now that you're all set up, let's dive into some best practices that'll help you hit the ground running:
Set up permissions for Jira sync— While we check your Jira access during sync, you'll still need to manage who sees what in Notion. Make sure your Jira admin account has access to these projects too. Remember that only folks with access to a project can add it to Notion, even if an admin has access.
Authenticate your account when adding or editing projects — Anyone in your workspace can set up a new sync in a teamspace they can access. However, you may need to connect your Jira account first for authentication. You'll also need edit access to make changes to existing syncs. While admin authentication handles the heavy lifting of syncing everything, your personal authentication lets us know who you are and what private projects you can bring over to Notion.
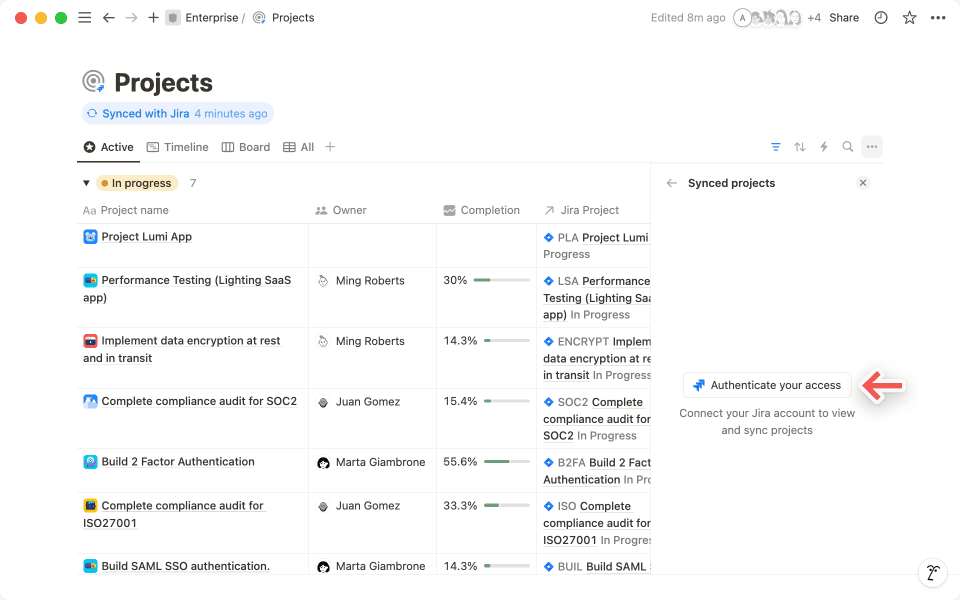
Make it your own with custom views — Once your Jira data is in Notion, anyone with access can create views that work best for them. Your product manager might love a Kanban board showing issues by status, while your QA team might prefer a table view focused on open bugs. The original data stays the same – you're just looking at it in different ways!
When to use "linked views" vs. "new syncs" — If your teamspace already has a Jira sync, create a linked view instead of a new sync to avoid the proliferation of duplicate data. For example, if Engineering has a Jira sync for bugs and Design needs to track them too, create a linked view of the existing sync. This keeps everything in sync and makes updates smoother.

Jira sync works with all Jira Cloud products
The real magic of syncing Jira happens when you create a unified information hub that supercharges your team's workflow. By combining Jira's robust project tracking with Notion's flexible workspace, you break down silos and give everyone access to real-time updates.
Let's dive into three ways that show you how to maximize its potential beyond basic database syncing:
1. Consolidate and sync Jira issues with your My Tasks database
Jira issues assigned to you now appear alongside your Notion tasks in the My Tasks database on your Notion homepage. This integration provides a unified view of all your tasks, regardless of their origin. Imagine you're an engineer launching a new feature. Now you can see all your to-dos in one place, no matter where they came from. Jira issues are easy to spot, denoted by a Jira icon next to the task, allowing you to quickly differentiate them from other tasks in your My Tasks database.

2. Run smoother and more collaborative engineering stand-ups
Jira is great for tracking project progress, especially during sprints. But for daily stand-ups and check-ins, it can feel a bit too structured. Imagine this — you're an engineering manager leading a team building a new mobile app. You're using Jira to keep track of your team's key tasks. Still, you're finding it tricky to capture all those important discussion points in Jira. Plus, you really want to bring more of those big-picture, qualitative ideas into your workflow.
Here's how to set up an efficient stand-up process using Notion and Jira:
Create a central stand-up corner in Notion — Start by making a page just for your stand-up meeting notes. You can use buttons or recurring database templates to quickly create your meeting notes. Divide your page into these three sections:
Sprint tasks— A space to sync your Jira sprints database
Discussion topics— A space to chat about roadblocks, ideas, pivots, and improvements
Action items— A space to capture action items on the go
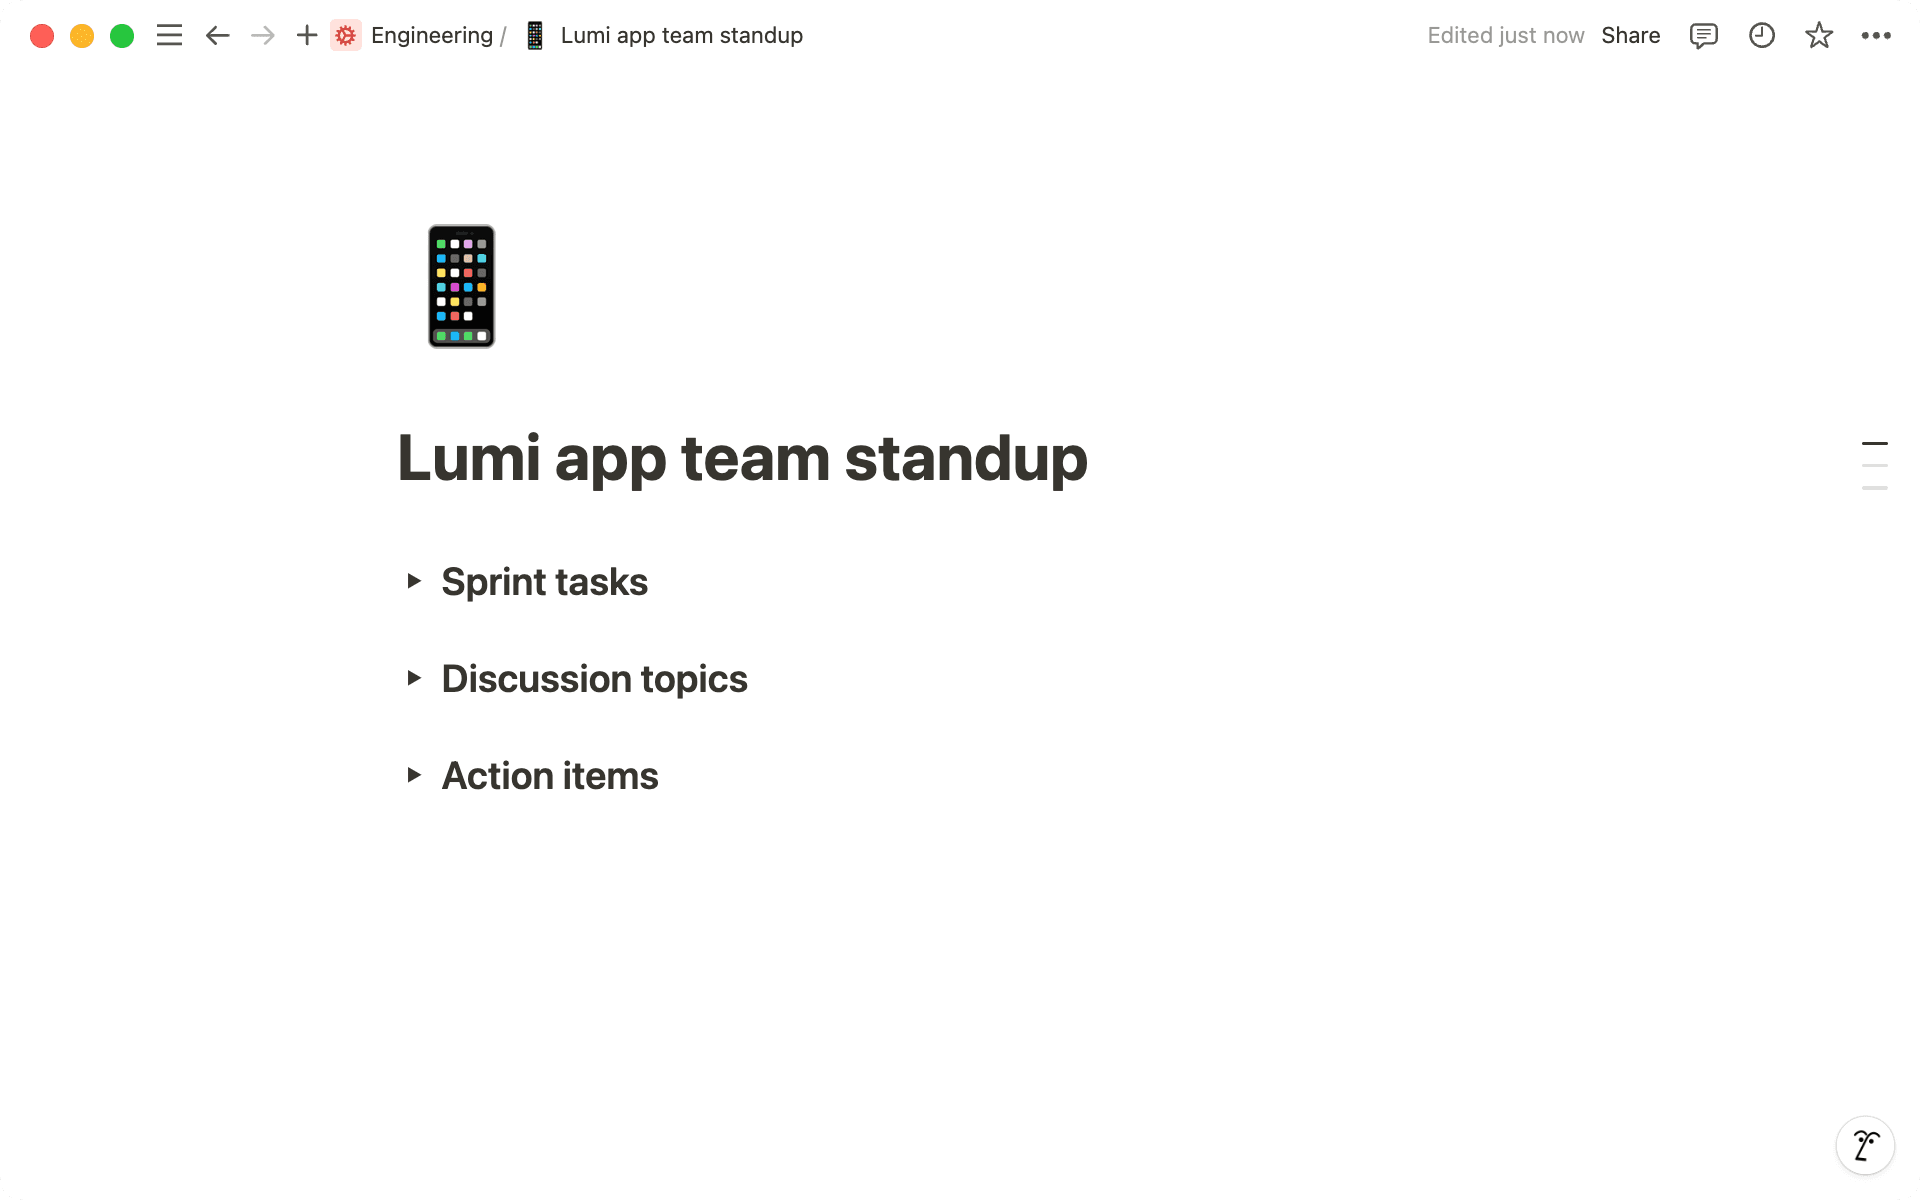
Integrate Jira sprints into your stand-up space — Under "Sprint tasks," add a linked view of your Jira sprint. This linked view offers real-time updates without duplicating data, keeping your workspace clutter-free. To add a linked view of your database, type forward slash
/linked view of databaseand select the database of your choice. You can fine-tune access permissions for both Jira databases and Notion docs, ensuring only the right people see your Jira data in Notion.
Capture insights and action items — Use the "Discussion topics" section to jot down brilliant ideas, key decisions, and crucial action items that pop up during the stand-up. This space is perfect for collaborative problem-solving, sharing quick team updates, and highlighting important announcements.
After the meeting, you can easily reference all your action items and takeaways in one place, making it simpler to add them into Jira. This way, nothing falls through the cracks, and you keep everything flowing smoothly between both platforms. By blending Jira's powerful structured task tracking with Notion's flexible note taking, you're creating a central resource that keeps everyone in sync throughout your project's journey.
3. Connect and centralize project resources in one unified space
A great project is more than just a to-do list or a sprint board. It's a mix of PRDs, tech specs, meeting notes, and even go-to-market plans. Combining Jira with Notion creates a complete hub for your projects. This setup brings together all important project parts in one place.
Let's say you're leading a project to set up two-factor authentication. Various elements play a crucial role in bringing this project to life. Here's how you can centralize all your resources:
Create spaces for all your documents — Create dedicated spaces in your Project hub to organize different document types. Set up areas for Tech Specs (PRDs), Design (mockups), and Meeting Notes (team discussions). This organized layout makes it easy for everyone to find what they need and add their own work. Try out different
page layouts to find one that works best for your team.
Bring in Jira projects and issues — After setting up your project space for the 2FA project, you can customize the Jira data display to match your team's needs. Show or hide properties that matter most to your team. For example, display active Jira issues with key details like work status and priority level. This gives your team a clear view of ongoing work without leaving Notion.

Connect your Jira tasks with other Notion pages — Tasks rarely exist in isolation. For example, the 2FA project might be part of a larger marketing campaign focused on online safety. You can easily visualize these connections in Notion by using relations to link your Jira tasks with related project pages. You can learn more about relations here.
By bringing all these elements together, you're breaking down information silos and giving everyone a clear view of the project's progress.
While Jira is great for engineering teams, it might not be as helpful for non-technical folks. These teams often want to pull out key project info from complex Jira setups and bring it into Notion's flexible workspace. There, they can connect it with things like meeting notes, project docs, or even create automations to kickstart their own work streams.
Here are three ways you can use Jira to extract the most important information without diving into the nitty-gritty of a technical Jira setup:
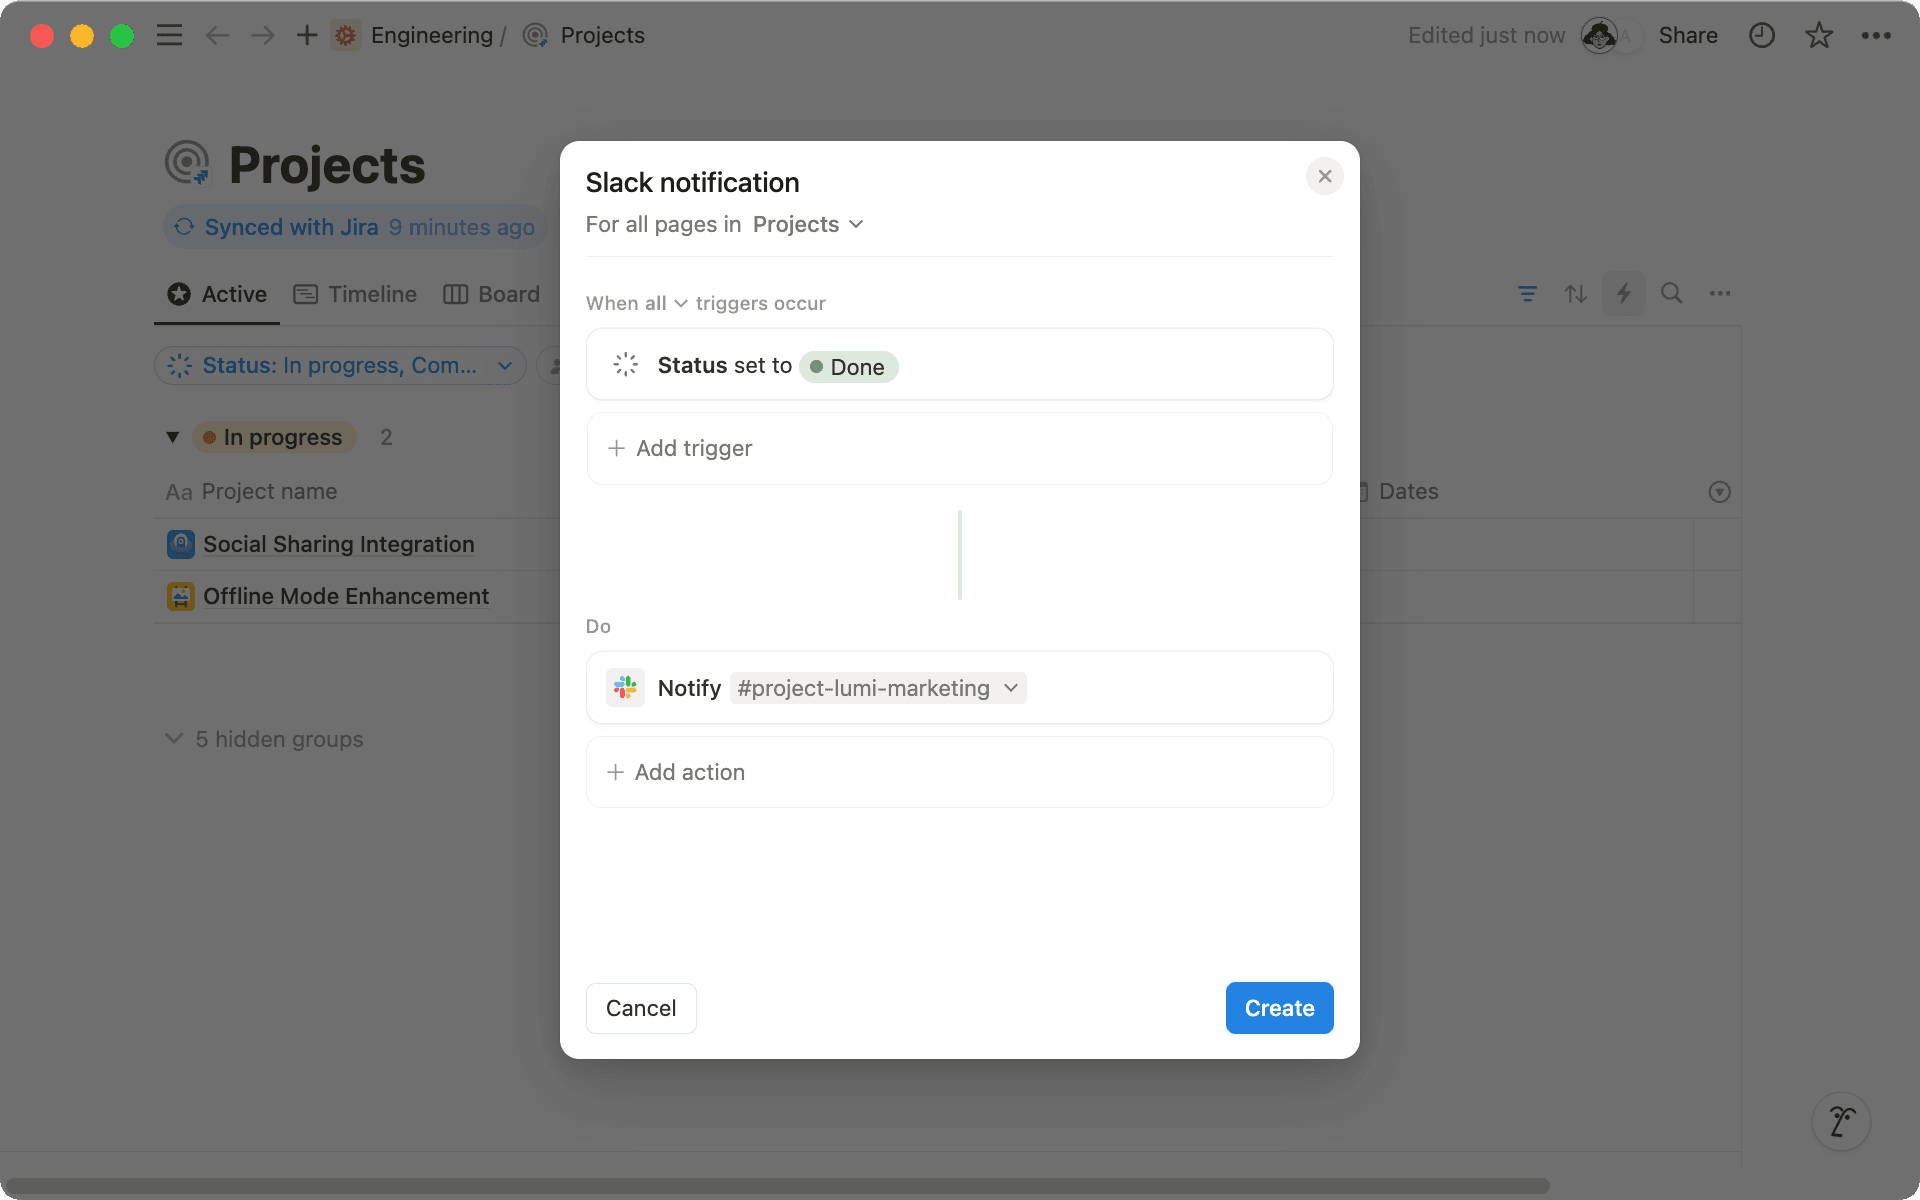
Send Slack updates to team channels— When a task in the "Website Redesign" project is marked as "Done" in Jira and synced to Notion, it can trigger a friendly Slack message to the #marketing channel.
Create new pages when something is added to Jira — For instance, when a new epic titled "Mobile App Overhaul" is created in Jira, a Product Requirements Document (PRD) template in Notion can be populated with the epic's details, creating a collaborative space for further planning and discussion.

Create rollups to see the completion rate of your projects — For example, create a rollup in Notion that shows the percentage of completed tasks for each sprint in your "Q4 Product Launch" project. This gives stakeholders a quick, clear view of project progress without needing to dive into Jira's technical details. You can learn more about roll ups here.
Uh-oh! It looks like your ad blocker is preventing the video from playing.
Please watch it on YouTube
These automations handle routine tasks automatically, helping your team work more efficiently and collaboratively.

Ask Notion AI about your Jira data right in your workspace
Jira sync brings teams together by connecting detailed project tracking in Jira with Notion's collaborative workspace. While Jira handles the technical nitty-gritty, Notion makes everything easy to find and use. The best part? Team members who don't need Jira's complex features can still stay connected through Notion. By bringing everything together in Notion, you'll break down information silos, boost cross-team collaboration, and save costs— all while keeping your work organized and in sync.
Something we didn’t cover?


