Use Notion’s Data Retention settings to keep your team compliant & restore content
Notion's custom data retention settings empower your team to effortlessly meet your company's compliance requirements. In this guide, we’ll show Enterprise workspace owners how to tailor data retention settings and recover deleted pages.
- Why teams might use custom data retention settings
- Translating Notion settings to meet your requirements
- What happens to deleted pages?
- Accessing content from the trash
- Restoring retained pages
Your company trusts Notion with its most important and confidential information. Thank you.
With the ability to set custom data retention settings in Notion, your team can now easily comply with your company’s requirements.
Whether you’re an IT professional setting up Notion for the first time, or just a contributor trying to be a good steward of your company’s data, it’s important to understand how different artifacts in Notion translate to your team’s specific policies.
Why teams might use custom data retention settings
For the majority of teams on Notion, you shouldn’t need to customize your data retention settings. However, there are a few reasons why you might want to consider setting custom retention settings. These include:
Meeting industry-specific regulatory standards —Data retention settings are important for compliance with industry-specific regulations, such as HIPAA for healthcare and GLBA for finance. These regulations often require that certain types of data be kept for a certain period of time, and failure to comply can result in significant legal and financial consequences. By implementing custom data retention settings, companies can ensure that they are meeting these requirements and avoiding any potential legal issues.
Internal data governance best practices —Your company might have specific standards across tools about how data should be retained. These can help reduce the risk of data breaches, reduce storage costs (in some tools), and ensure that data is only kept for as long as it is necessary. Furthermore, retention settings can help companies manage their data in a more structured way, making it easier to find and use the data they need.
Litigation & Legal Management —Data retention is also important for litigation matters because it can help protect the company from legal claims. By retaining data, companies can demonstrate that they have taken reasonable measures to preserve evidence and comply with legal requirements. This can help reduce the risk of sanctions or other penalties for spoliation of evidence.

Data retention in Notion
For more information about data retention in Notion, check out our help center article.
If you fall into one of the groups above, you will want to consider using custom data retention settings to keep your Notion use compliant. These settings dictate what happens to Notion pages after they’re placed in the trash.
If you’re not familiar with Notion, check out the following definitions before moving on:
Pages —Notion pages are where all of your content lives. These are roughly analogous to a document in a traditional word processing software. Pages you and your team are working on can be viewed in the sidebar in the left-hand side of your app.
Sidebar —The sidebar, located on the left hand side of the app, is your navigation hub for all things Notion. Its where you organize, rearrange, and find your pages within your workspace. If pages are like documents, the sidebar is like your file manager.
Trash —This is where deleted pages live until they are “retained” (more on that later). You can find and sort through pages in the trash on the bottom left hand side of your sidebar.

A note on blocks
Blocks are the way you build in Notion. Everything that sits on a page is a block including text, images, and tables. You can mix and match different blocks to create unique pages and tools for your team.
When blocks are deleted, they exist in page history, which is retained alongside the page itself.
What happens to deleted pages?
When pages are deleted, they and all of their contents immediately move to the trash. Notion’s data retention settings dictates what happens to pages and their content after they’re placed here.
There are three locations a document can be in after it is moved to the trash, and your data retention settings allow you to dictate how long pages stay in each of these locations.
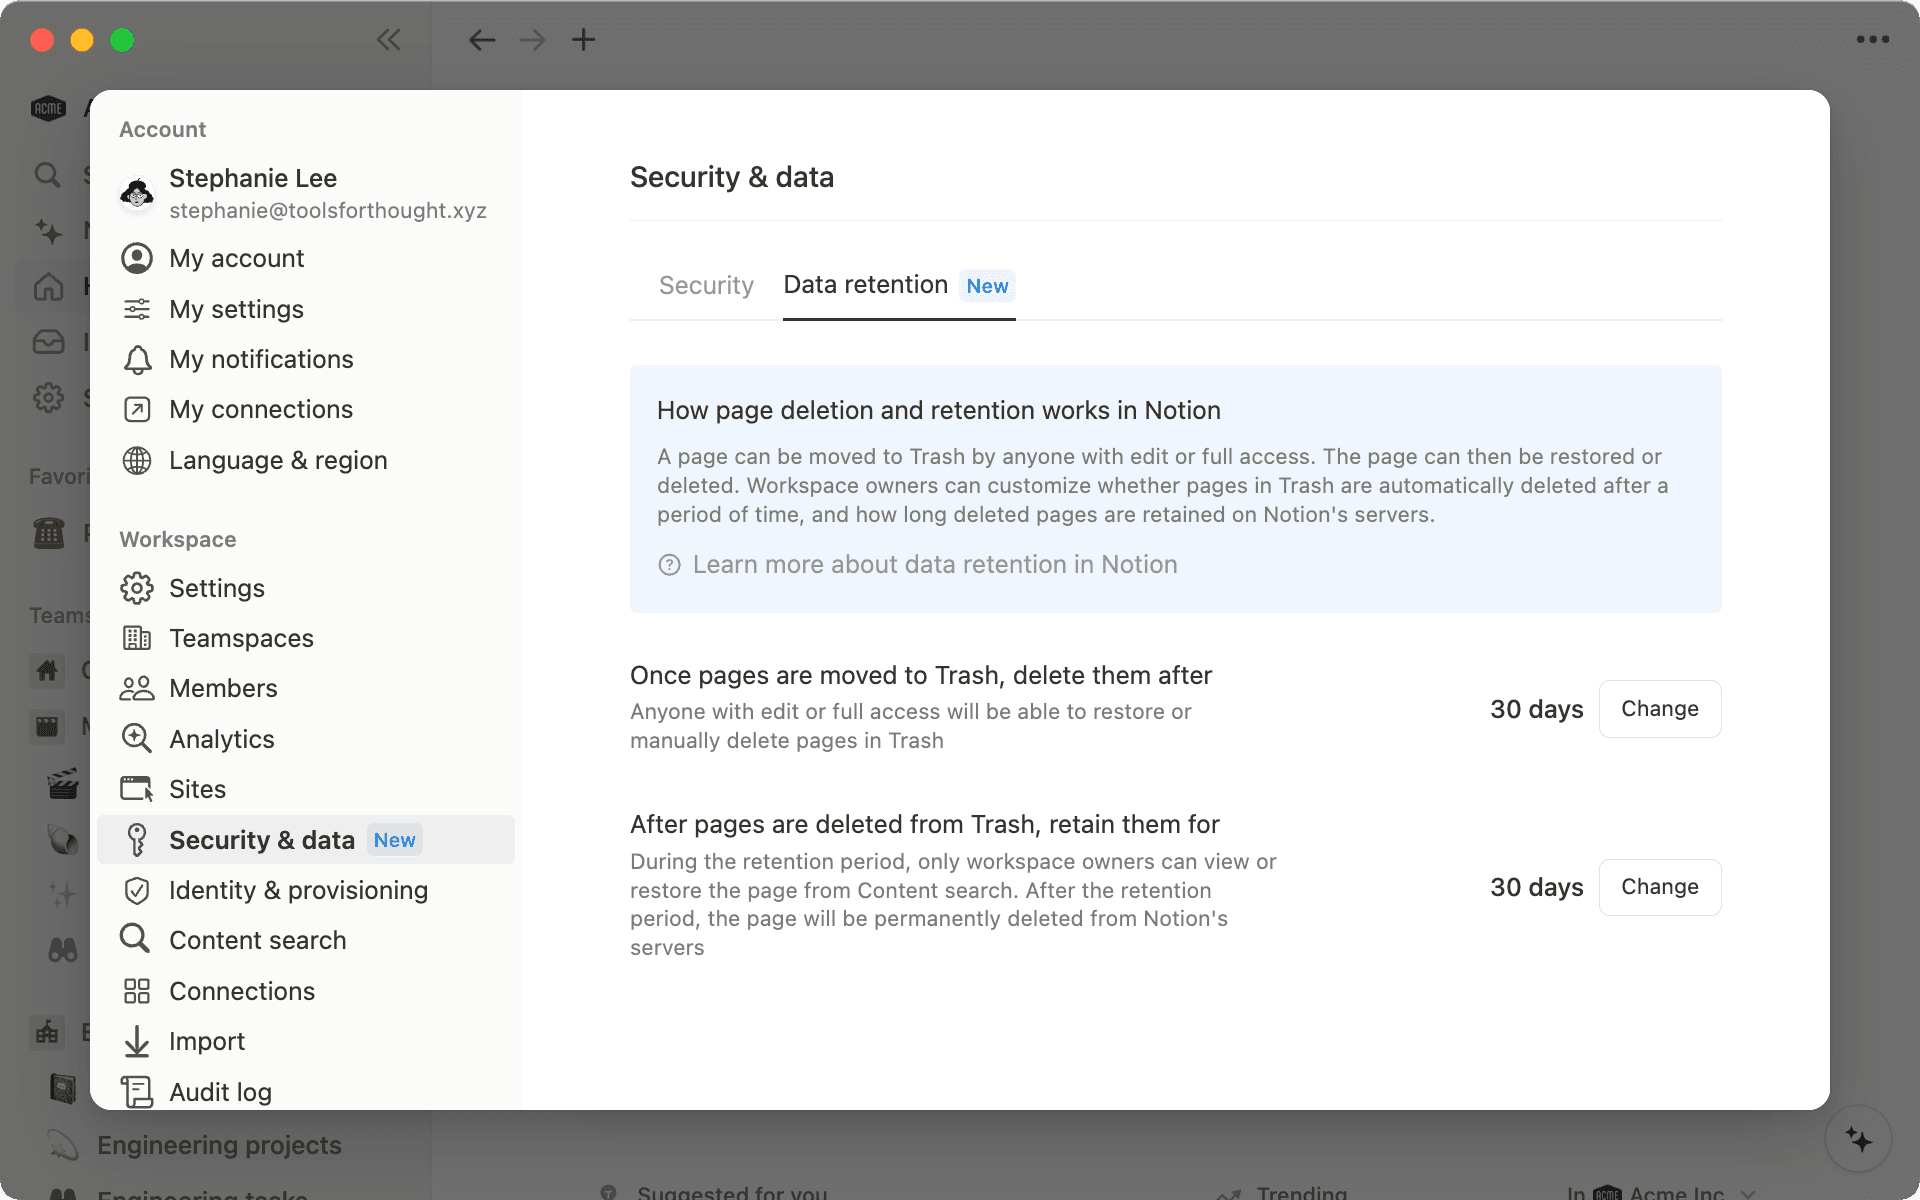
Pages in trash —To start, pages that have been deleted will be stored in trash. As an Enterprise workspace owner, you have the ability to customize how long pages will stay in trash before they are deleted. The default is 30 days, but workspace owners can set this to be up to 10 years.
Retained pages (Deleted from trash) —After pages are deleted from trash (whether that’s done manually using the “permanently delete” button, or because they’ve reached their time limit), pages will enter a retention period. Again, the default here is 30 days, but workspace owners can set this to be up to 10 years.
Purged pages —Pages that have been deleted from the trash and have passed their retention period are purged from the system and are not restorable by anyone.
Accessing content from the trash
Anyone that had access to a page can find and recover it from the trash using the left hand sidebar. This way, most of your Notion teammates can self-serve in the case of accidents.
As an Enterprise workspace owner, you can restore deleted pages once they enter the retention period.

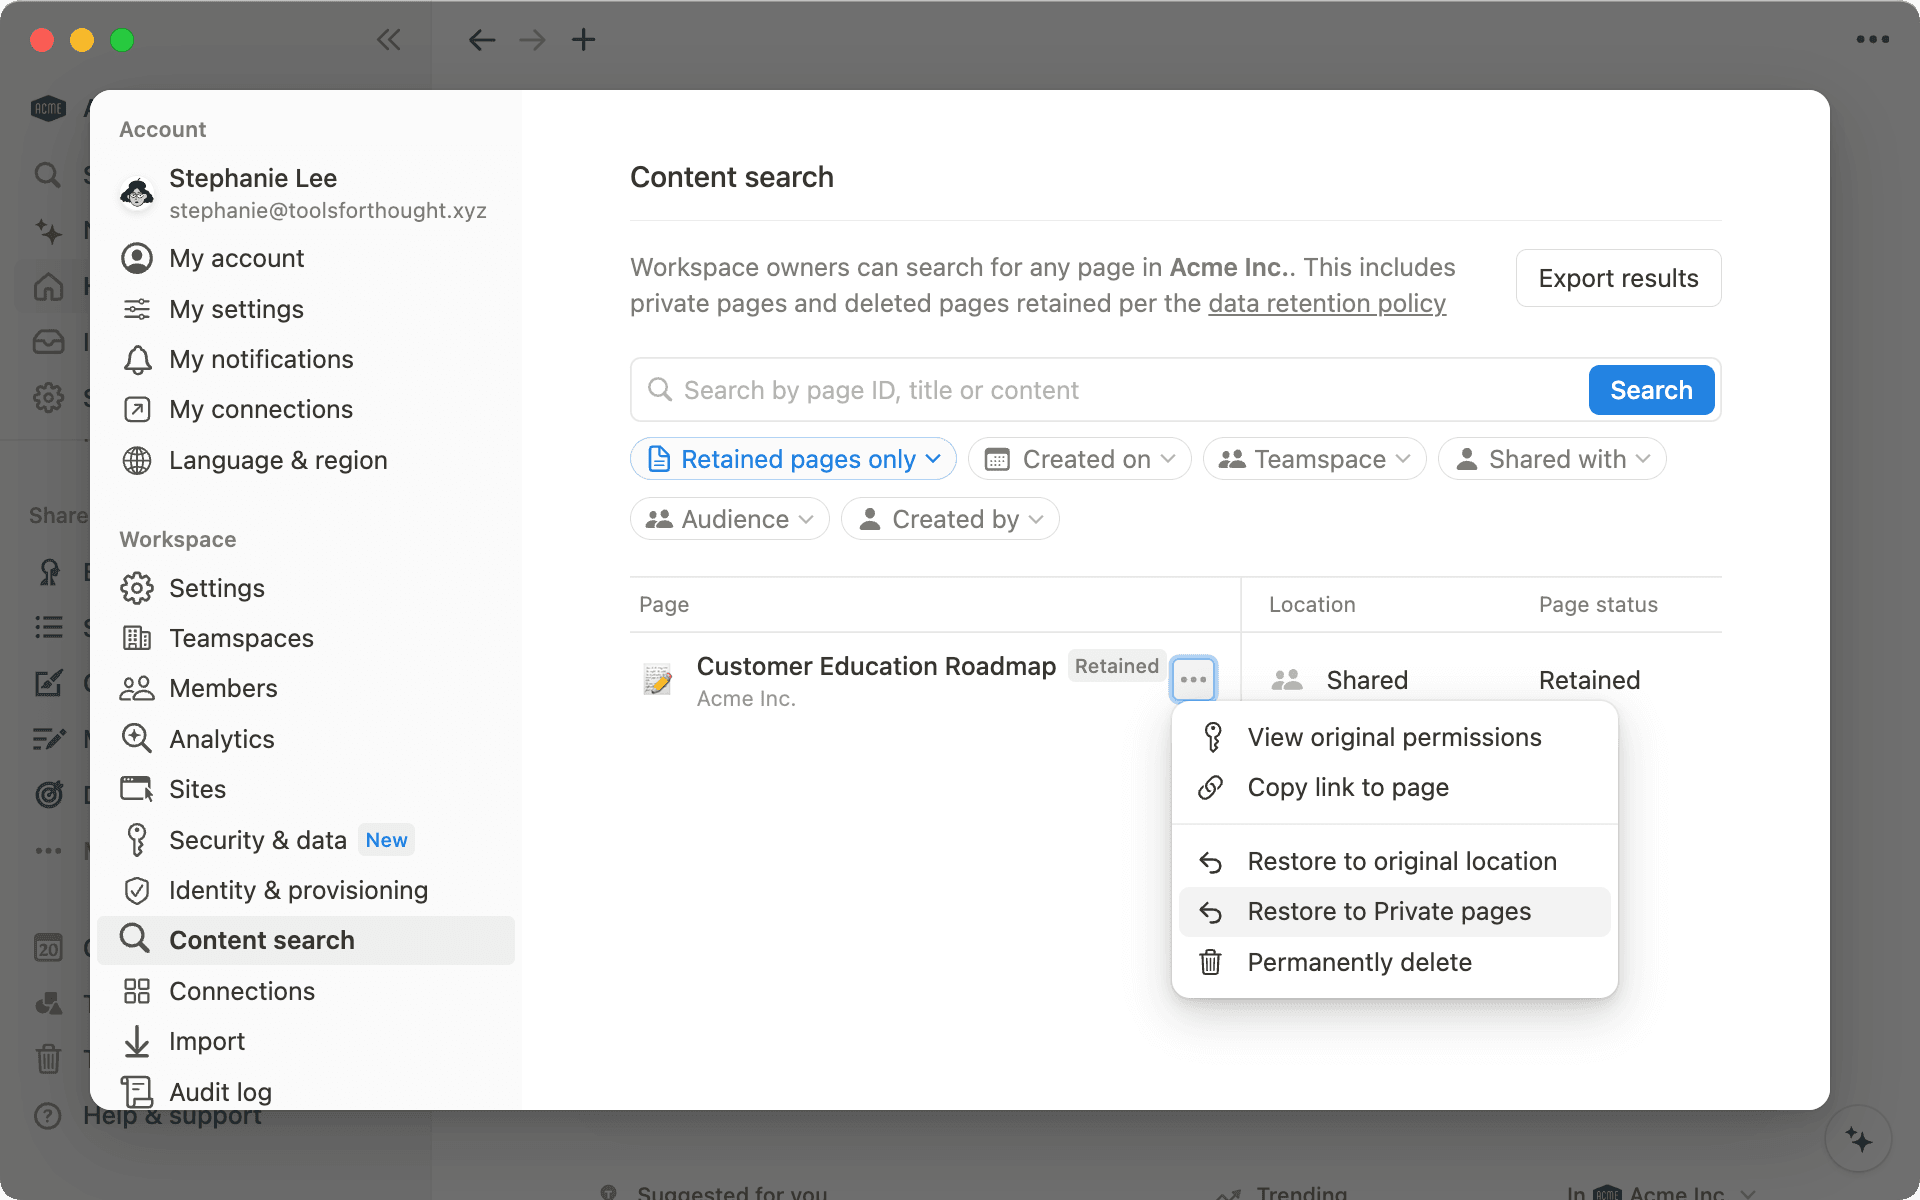
Enterprise workspace owners can also use Content Search to find pages in the trash and restore them. To access Content Search, navigate to Settings and members in the left hand sidebar. You'll find Content Search under the Workspaces section.
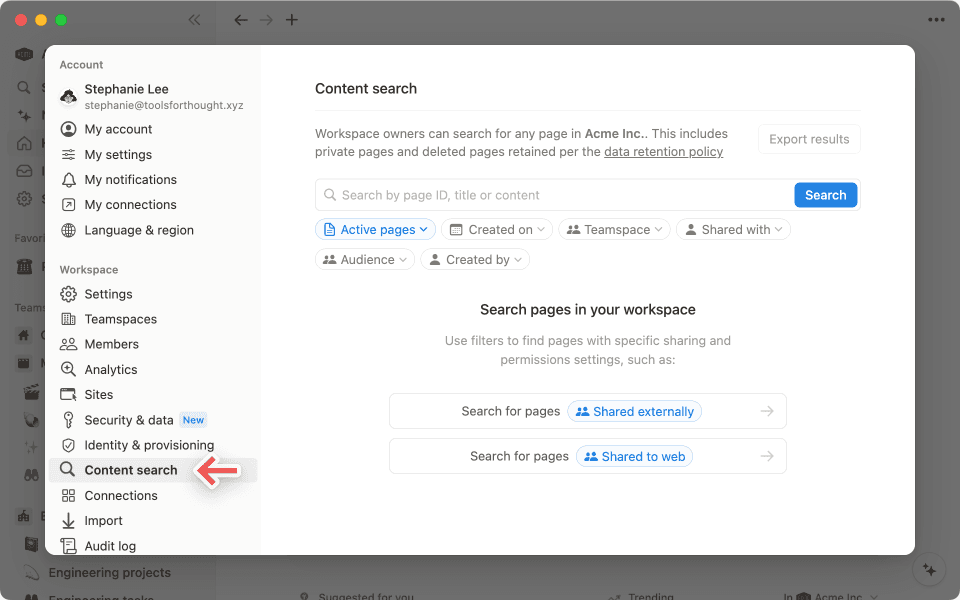
Select Retained pages from the drop down menu and locate the page you want to restore.
For retained pages, pages that were deleted from trash and are still in the retention period, workspace owners can use the admin content search to find and restore them.
When you do this, you’ll find two options. Here’s how we suggest you use each:
Restore page to give access to other workspace members —This will restore a page to its original location, granting access back to those who originally had it. You’ll most likely use this in the case of accidents (because they can happen!) like unintended page deletions or provisioning errors.
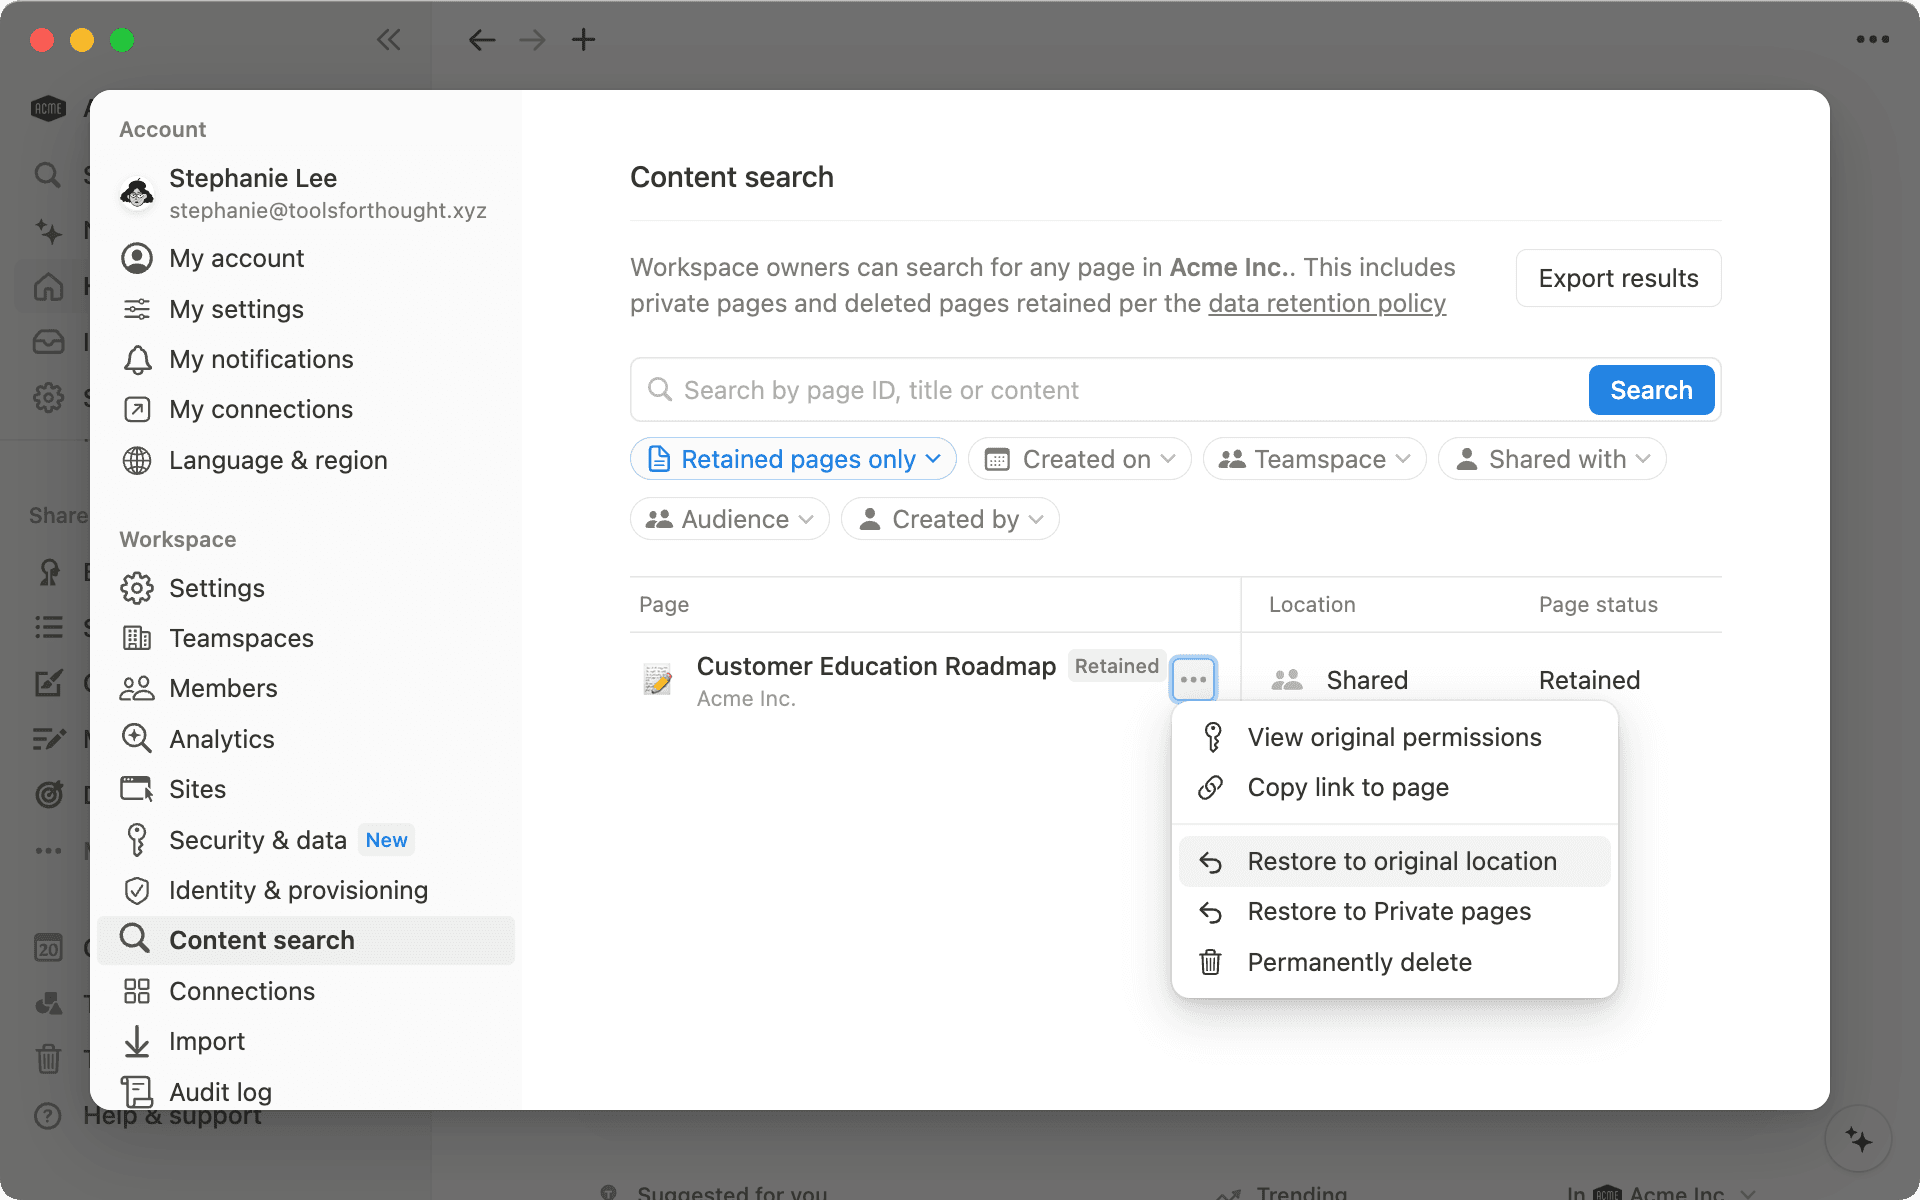
Restore to your private pages to keep things confidential — This will move the page into your (the restorer’s) private page section, without granting access to anyone else in your workspace. This can be handy when you need to restore pages behind the scenes, like in the case of a sensitive legal or HR matter.
설명되지 않은 부분이 있나요?



![[External] 2022 Annual Reflection [Gumroad v1]](/_next/image?url=https%3A%2F%2Fs3.us-west-2.amazonaws.com%2Fpublic.notion-static.com%2Ftemplate%2F6b873d6d-8869-461f-95e6-3cd9b126d191%2Fdesktop.png&w=640&q=75)


